Collecting Writing data

Collect at least two different writing samples for each student and use a writing rubric based on the 6 +1 Traits (Culham, year) to assess the writing. Ideally, this would be done each term. Sample pieces include, but are not limited to:
- Narrative
- Non-Fiction
- Fiction
- Persuasive
- Poetry
- Biography
- Explanatory
- Comparative
Using the Writing Development Data Sheet to Inform Your Teaching
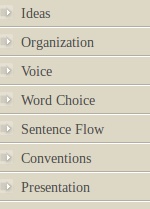
After assessing the two writing pieces, it's time to make note of students' strengths and areas for improvement. In writing, we are focusing on 6+1 key areas for optimum learning: Ideas, Organization, Voice, Word Choice, Sentence Flow, Conventions, and Presentation. (Culham, 2005). I have broken those down further into 10 specific strategies to focus on in my  Writing Development Data collection form. Being that I work mostly with students in grade one and two, I have added more specific columns under the conventions column.
You will notice that each strategy has two columns under it. As you will see, the column on the left has a single outline and is meant for recording strengths. The column on the right has a double line around it and is meant for recording areas the student should work on next.
Good teaching and good planning are both about noticing student strengths first. Look at the results from the rubric and decide what the student is doing well and which strategies are being applied. Place a dot under the left column for each strategy that the child has demonstrated. Over time you will be looking for evidence of a child demonstrating success in an area about four times before you can say the child has mastered it. However, this initial dot is just to get you started with noticing strengths.
After careful consideration of the information gathered from the writing rubric, decide which areas would make most sense for the child to work on next. Place an asterisk under the right column below the strategy to work on. Limit your asterisks to no more than three. A student may have lots of strategies to work on, but imposing too many goals will be overwhelming. Stick with what makes sense to focus on next, and you can work up from there as time goes on.
Once your assessment is complete for each student, you now have key information about your entire class on one sheet! This informative information will help you guide your students in setting goals, will guide your own instruction, and will be invaluable tool for sharing with parents through meetings and report cards.
To help your planning, take a careful look at the sheet, column by column. You can see at a glance which strategies your class is doing well with (lots of dots), and which need extra guidance (lots of asterisks). Our goal is to individualize instruction as much as possible. We know that it is best to teach to the whole group if what is being taught is something the majority of the students need. Since, in any given class, there are students of all levels, it is important to use one-on-one instruction as well as small groups (guided teaching) to provide direct instruction for those particular students' needs, whenever possible.
This data collection / planning tool helps you decide what to teach to the whole group, what is best for small groups, and what should be saved for one-on-one conferences. If 50% or more of your class needs help with a particular area, you will continue to teach that strategy to the whole group. If only about 1/3 of students need help in a particular area, you can save that for small groups. Remember, you can have two small groups working on similar strategies. If only one or two students need help with a particular strategy, then use your one-on-one conferences for that.
6 +1 Traits of Writing
